
Set account-wide campaign defaults (Settings > Campaigns)
Configure once, for every campaign in the account: visitor identifier, approvals, mutually exclusive groups, priority rules, QA rules, default traffic, statistics thresholds, labels, variables and editor behavior.
The Wingify Guide can move a cursor on your screen inside the app and walk you through this, click by click (8 steps).
#When to use this
Your team now runs a dozen campaigns a month, and every campaign owner re-enters the same things. Examples: the same QA IP, the same 500-visitor minimum, the same labels. Meanwhile, two tests on the checkout page keep overlapping. Settings > Campaigns holds the account-wide defaults and rules that every new campaign inherits. Set them once, and campaign owners can still override most of them per campaign.
#Before you start
- You need Admin access to change account settings.
- Several options are Enterprise-only: approvals, priority rules, 1 visitor 1 campaign, and custom visitor identifiers.
- Most defaults apply to new campaigns only. Existing campaigns keep their settings.
#Steps
#1. Open Campaigns settings
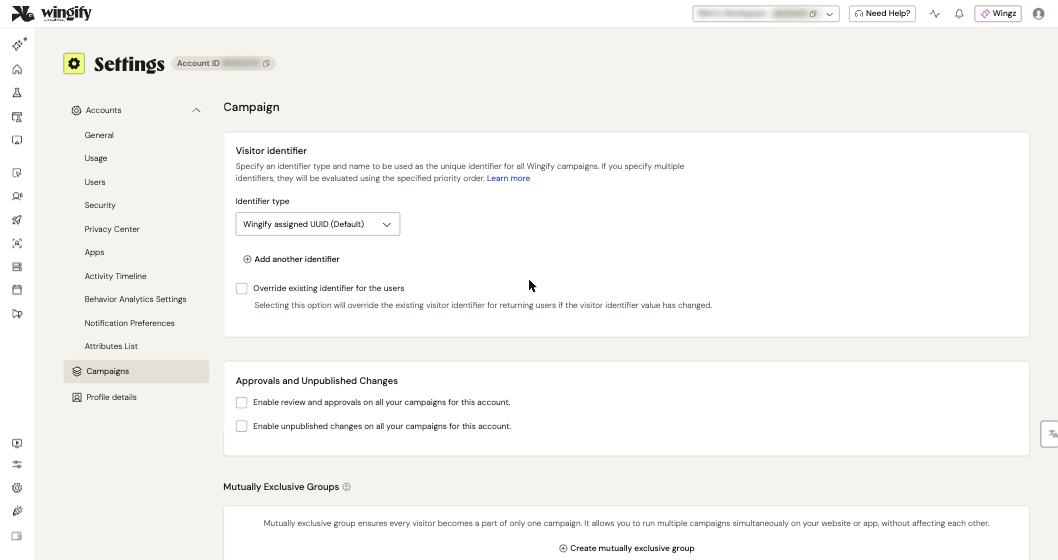
In the left sidebar, click Settings, then Campaigns (below Accounts). The page is long. Each section below is a block on that page. Click Save after changes.
#2. Choose how visitors are identified
Under Visitor identifier, the Identifier type defaults to Wingify assigned UUID. You can use your own ID instead: a cookie, local storage key or JavaScript variable. Click Add another identifier to set fallbacks, which are evaluated in priority order. This is an account-level setting for all campaigns and products. Details, including Override existing identifier for the users, are in Exclude internal traffic and manage visitor data.
#3. Control who can publish changes
Under Approvals and Unpublished Changes:
- Enable unpublished changes on all your campaigns for this account lets editors change a running campaign with Save as Unpublished, preview the changes, then Apply Changes.
- Enable review and approvals on all your campaigns for this account makes approval mandatory. Choose approvers (users with Publish, Admin or Owner rights), and optionally set an auto-approval time frame and Bypass Approval via Developer API. Unpublished changes must be enabled first.
#4. Keep concurrent campaigns from colliding
- Mutually Exclusive Groups > Create mutually exclusive group: each visitor joins only one campaign of the group (up to 30). Choose the platform (Website, Mobile, Feature Management). The winner is picked randomly, by priority or by weight. A campaign can be in only one group.
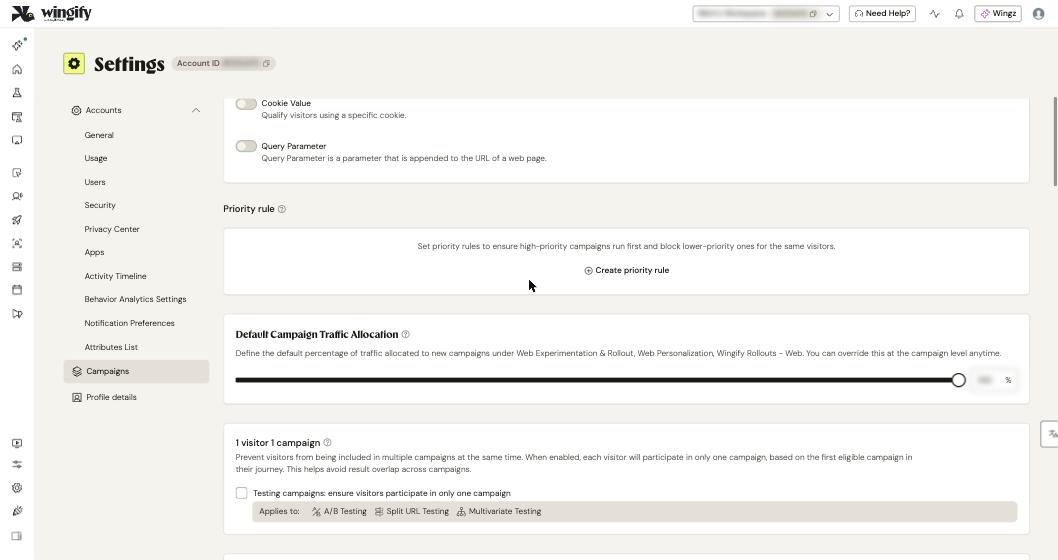
- Priority rule > Create priority rule: rank up to ten campaigns into tiers P1, P2 and so on. A visitor who qualifies for a higher tier sees all campaigns in that tier and is excluded from lower tiers. Supported campaigns are A/B, Split, Multivariate, surveys, Web Personalization and Web Rollout. If a campaign is in both, the mutually exclusive group wins.
- 1 visitor 1 campaign: select Testing campaigns: ensure visitors participate in only one campaign. It applies to A/B, Split URL and Multivariate tests, account-wide. Visitors stay locked into the first eligible campaign, in order of creation, which reduces the traffic available to other tests.
#5. Set QA and traffic defaults
- QA Configurations: turn on default QA conditions (IP Address, Cookie Value, Query Parameter). They decide who sees a campaign while it's in QA. Campaigns can adjust them in REVIEW > QA Configurations.
- Default Campaign Traffic Allocation: the percentage of traffic that new Web Experimentation & Rollout, Web Personalization and Rollouts campaigns start with. You can override it in any campaign.
#6. Set statistics defaults
- Thresholds (Multivariate and Web Personalization): Winning Variation Threshold, Losing Variation Threshold and Minimum Visitors Required.
- Observatory Mode: Minimum Visitors per variation, Minimum Conversions per variation and Compute statistics after X days. New campaigns inherit these values. You can change them per campaign in SmartStats Configuration while the campaign is in Draft. See Configure SmartStats and guardrails.
#7. Organize and reuse
- Manage Labels > Add New Label: create labels. They must exist before users can tag campaigns and filter lists with them.
- Saved Variables > Add New Variable: define a Label, Variable and Default Value for reuse across campaigns.
- Notifications: push notifications on this device, for example when a campaign declares a winner. Avoid them on shared devices.
#8. Tune how changes are applied on your pages
- JavaScript execution timing (future campaigns only), for example Run as soon as possible.
- Editor settings > Selector path settings: Consider both IDs and classes (recommended) is the default. If your site generates dynamic IDs or classes, choose only classes, only IDs, or ignore both. Use Exclude Classes and IDs from selector paths for specific dynamic attributes.
- Single page application / server side rendering support settings: Keep applying changes even after the page is loaded, Re-apply changes whenever modified elements are rendered afresh (useful for React, Angular, Vue and similar), and Delay applying changes until hydration completes (Next.js and Nuxt.js only).
- Code Editor Settings (Minify JavaScript/CSS code) and Change image options (Show animation when image is loading).
#9. Decide on data export and self-hosting
- Data export: select Disable data export to turn off exporting campaign data.
- Self-Host campaign JS is covered in Advanced SmartCode setup.
Click Save.
#Check that it worked
Create a test with Experimentation > Web Experimentation > Create > AB - Single Page. Its traffic allocation, observatory mode values and QA conditions should match your new defaults. The labels you created should appear in Notes & Labels. With approvals on, the campaign shows Send for Approval instead of starting directly.
#Common questions
Priority rules or mutually exclusive groups: which one do I need? Use a mutually exclusive group when a visitor must see only one of several related tests. Use priority rules when an important campaign must win over less important ones, such as a sale banner over a survey. Visitors can still see several campaigns within the same tier.
Why did a campaign's traffic drop after I enabled 1 visitor 1 campaign? Visitors already locked into earlier campaigns are no longer eligible for it. Pausing their campaign doesn't free them: they stay locked until you disable the setting or they clear their cookies.
Can I use different visitor identifiers per campaign? No. The Visitor identifier setting applies to the whole account.
Do selector path settings change existing campaigns? No. Workspace-level editor settings only apply to campaigns you create afterwards. Campaign-level settings override them.
#Learn more
- Configure Campaign Specific Settings in Wingify
- Wingify Campaign Approvals
- How to Set Up Mutually Exclusive Campaign Groups in Wingify
- Set Up Campaign Execution Order using Priority Rules
- Configure One-Visitor-One-Campaign for Wingify Web Experimentation
- Configuring SPA / SSR Support in Editor Settings
Help-center sources (12)
- Configure Campaign Specific Settings in Wingify
- Configure Custom Visitor Identifiers in Wingify
- Wingify Campaign Approvals
- Making Unpublished Changes to Wingify Campaigns
- How to Set Up Mutually Exclusive Campaign Groups in Wingify
- Set Up Campaign Execution Order using Priority Rules
- Configure One Visitor One Campaign for Wingify Web Experimentation
- Configure Observatory Mode in Your Testing Campaigns
- Manage Labels in Wingify
- Configuring Selector Path Options in Editor Settings for Your Website Elements in Wingify
- Configuring Single Page Application Server Side Rendering Support in Editor Settings for Your Website in Wingify
- Review and Launch Your Campaign