
Use the Wingify REST API: create API tokens and manage authorized apps
Generate an API token in the Developer Dashboard, call the Wingify REST API with it, and review or revoke the third-party applications that can access your data.
The Wingify Guide can move a cursor on your screen inside the app and walk you through this, click by click (8 steps).
#When to use this
You want to work with Wingify from code instead of the app. For example, you want to start or pause tests automatically, pull campaign reports into an internal business dashboard, or connect a tool that asks for a Wingify API token. The Wingify REST API authenticates each request with an API token that you create in the Developer Dashboard. You can also review which third-party applications can access your data and revoke them.
#Before you start
- The Wingify API is available on the Enterprise plan.
- Decide which permission the token needs. A token's permissions limit what it can do. For example, a token with Browse permission can read Wingify data but can't edit anything. See Roles and Permissions in Wingify and Invite users and assign roles.
- Plan where to store the token securely, such as a secrets manager. Wingify shows a token only once, right after you generate it.
- If you only want to use Wingify data in Claude, ChatGPT or Gemini, you don't need a token. See Connect Wingify with the Wingify MCP Server.
#Steps
#1. Open the Developer Dashboard
Scroll to the footer of any Wingify page and click Developer resources. The Developer Dashboard has four tabs: Introduction, Tokens, Applications and Wingify MCP Server. Introduction explains the REST API, access tokens and third-party applications. Click Read More to open the API documentation.
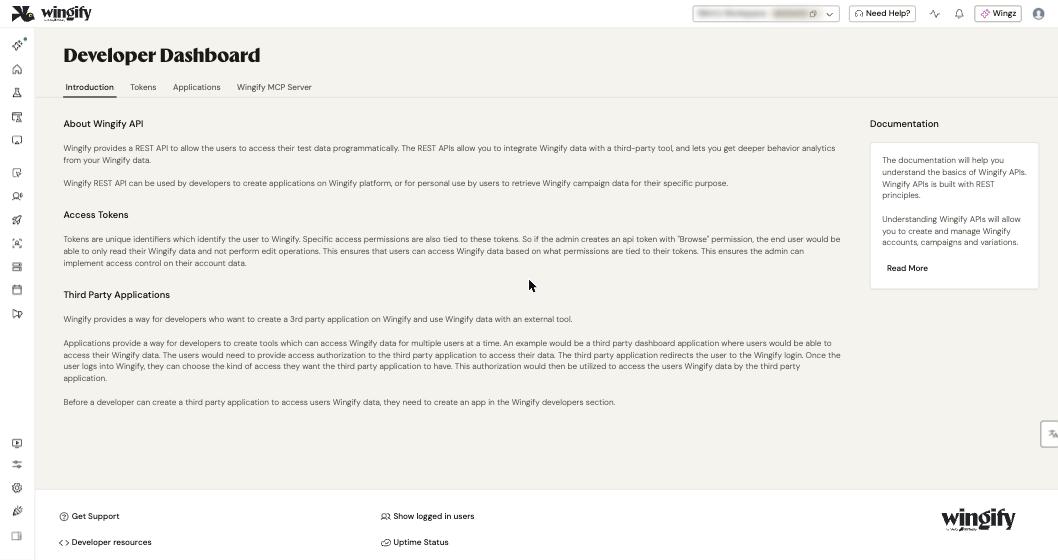
Note: Some older help articles call this link Developers. You can also open https://app.wingify.com/#/developers/tokens directly.
#2. Generate an API token
- Open the Tokens tab. It lists the tokens you've already created.
- Click Add another API token.
- Enter a token name that says what it's for, for example "BI dashboard - read only".
- Select the permission type. Choose the lowest level that works. Use Browse for read-only reporting.
- Click Generate.
Copy the token right away and store it securely. For security, Wingify doesn't show it again.
Warning: Treat a token like a password. Never paste it in tickets, chat messages, screenshots or front-end code.
#3. Call the API with your token
Send the token in a token request header. The base URL is https://app.wingify.com/api/v2. In the path, you can use current as the account ID to refer to the main workspace, or give a workspace ID. For example, this call lists your websites:
curl --request GET 'https://app.wingify.com/api/v2/accounts/current/websites' \
  --header 'token: YOUR_API_TOKEN'
Replace YOUR_API_TOKEN with your token. It's best to read it from an environment variable. For all endpoints (campaigns, variations, sections, websites, widgets, metric reports), see the API reference.
#4. Replace or delete a token
If you lose a token, you can't display it again. Create a new one instead:
- On the Tokens tab, note the name of the old token.
- Click Add another API token, reuse the name and the same permission, and click Generate.
- Update the token in the tool or script that uses it.
- Find the old token by its creation date, click the vertical ellipsis (⋮) and select Delete.
#5. Review third-party applications
Third-party applications can access Wingify data for many users. The user logs in to Wingify and chooses the access to grant, instead of sharing a token. The Applications tab of the Developer Dashboard is for developers. Before a developer can build such an application, they must create an app in the Wingify developers section.
#6. Revoke an application's access
In the left sidebar, click Settings > Apps. The Authorized Applications list shows the applications that can currently use your Wingify data, with Application Name, Account, Authorized by, Permission and Authorized on. Click Revoke next to any application that no longer needs access.
#Check that it worked
- Your new token appears on the Tokens tab.
- The test call above returns a
_datalist of your websites. If you get an authorization error, check the header name (token), the account ID and the token's permission. - A revoked application no longer appears under Settings > Apps.
#Common questions
I can't see the token I created last month. Where is it? Wingify shows a token only once, when you generate it. Generate a new one, update your integration, and delete the old one.
Which permission should a reporting token have? Use Browse. Tokens carry permissions, so a Browse token can read data but can't change campaigns. This limits the risk if the token leaks.
Some articles use app.vwo.com in API examples. Which domain should I use? Help-center examples show both app.vwo.com (accounts created before June 14, 2026) and app.wingify.com (accounts created on or after that date). Use the one that matches your account's creation date.
Is the old FullStack API still maintained? No. Wingify FullStack only receives critical bug and security fixes. For server-side testing, use Feature Management and its SDKs.