
Install the Wingify SmartCode on your website
Register your domain, add the SmartCode to your site (manually or with a CMS plugin) and confirm that Wingify detects it.
The Wingify Guide can move a cursor on your screen inside the app and walk you through this, click by click (4 steps).
#When to use this
Before Wingify can show a variation, record a session or build a heatmap, your pages must load the Wingify SmartCode. The SmartCode lets your website talk to Wingify's servers. For example, you want to test a new homepage headline next week: first register your domain, add the SmartCode to your site template once, and check that Wingify detects it. Installing the SmartCode is a one-time task. After that you can create as many campaigns as you like.
#Before you start
- You can edit your website's
<head>(template, theme or CMS admin), or you know a developer who can. - You know the domain you want to connect (for example
example.com). - If visitors must give consent before tracking starts, read Configure privacy & GDPR settings first.
#Steps
#1. Open Websites and Apps
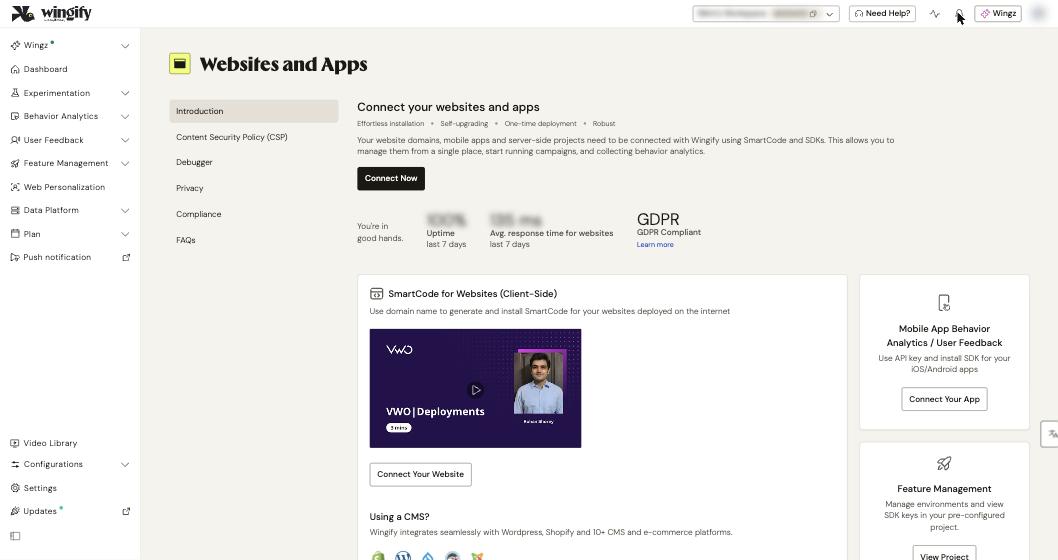
In the left sidebar, click Configurations > Websites and Apps. The Introduction page explains how to connect websites, mobile apps and Feature Management projects.
#2. Register your domain
In the SmartCode for Websites (Client-Side) section, click Connect Your Website. (You can also use Connect Now and pick the platform type.) Enter your domain name and click Add domain. Wingify checks the site and generates a SmartCode for it. Your domain then appears in the Websites and Apps list.
Note: If your main domain (for example abc.com) is registered, you don't need to register subdomains such as shop.abc.com separately. Each extra entry uses a slot from your domain quota. Register a subdomain on its own only if it needs its own tracking or SmartCode settings.
#3. Choose asynchronous or synchronous code
Click your domain to open it. The Code tab shows the SmartCode, which is Asynchronous by default. To change it, click the settings icon (⚙) above the code, select a code type and click Save.
- Asynchronous (recommended): loads in parallel with your page, so it never slows the page down. If Wingify's settings or library don't load within their timeouts, visitors see the original page.
- Synchronous: runs in the order it appears on the page. Use it when you need strict control over script execution order. It has built-in single-page application (SPA) support.
The same dialog also lets you change the settings and library timeouts, Avoid flicker due to Rocket Loader and Hide body tag in HTML. Click Reset to defaults to undo your changes.
Warning: If you change the code type or the Rocket Loader option after installation, replace the code on your site with the updated snippet.
#4. Add the SmartCode to your pages
Pick one method:
- Manually: copy the SmartCode and paste it between
<head>and</head>on every page where you want to run campaigns. If your site uses a shared header template, paste it there once. To send the code to a developer, click the share button to email it. - With a CMS plugin: if your site runs on WordPress, Drupal or Shopify, Wingify detects the platform and shows the matching plugin. Wingify also supports Magento, BigCommerce, Joomla and other platforms (see Extensions and Plugins in Wingify). For example, the WordPress plugin only needs your account ID and a code type.
Warning: Don't install the SmartCode through a tag manager such as Google Tag Manager. Tag managers load the code late, which can cause flicker and timeouts that keep visitors out of your test.
Also keep in mind:
- Add the code only once per page. Duplicate snippets can cause flicker or blank pages.
- If you test content inside an iframe, the iframe page needs the SmartCode too.
- Frameworks such as Next.js, Nuxt, React Helmet, Gatsby and Shopify Hydrogen need specific setups. See Configure the Wingify SmartCode for Your Website.
#5. Check the installation with the SmartCode checker
On your domain's Code tab, enter a page URL in Check if SmartCode is installed properly on your URL and click Check. Wingify opens the page in a new tab and waits up to 30 seconds. If everything is fine, you see "SmartCode is correctly installed at this URL". You can check one URL at a time.
#Check that it worked
- In Configurations > Websites and Apps, the domain's Status changes from No SmartCode detected to Connected once a visit is detected. This can take a few minutes.
- For a deeper scan (placement, CSP, consent manager, duplicate code), run the Debugger. See Check that SmartCode works.
#Common questions
Why do I see "SmartCode is not installed" right after registering? That's expected until Wingify detects the code on a live page. Visit the page yourself, then refresh the Wingify app. The status is not updated in real time.
The checker says a different account ID was found. What does that mean? The page loads the SmartCode of another Wingify account. Replace it with the code from your own domain entry.
The checker timed out after 30 seconds. Is the code missing? Not necessarily. The code may be missing, or it didn't run within 30 seconds. Browser blockers such as uBlock can also block Wingify calls. Whitelist Wingify or disable the blocker and try again.
Does the "not installed" message affect my reports? No. If the code is in your HTML, Wingify collects data even if the message is still shown.