
Install a Feature Management SDK and evaluate your first flag
Install the Wingify Feature Management SDK for Node.js or Python, initialize it with your Account ID and SDK key, evaluate a feature flag for a user and track a conversion event.
The Wingify Guide can move a cursor on your screen inside the app and walk you through this, click by click (9 steps).
#When to use this
Your product team has created a feature flag in Wingify and now a developer needs to wire it into the backend. This guide takes you from an empty project to a working getFlag() call and a tracked conversion, using the Node.js or Python SDK. The same four calls (init, user context, getFlag, trackEvent) exist in every Feature Management SDK, so the flow also applies to Java, .NET, Go, PHP and Ruby.
#Before you start
- A feature flag exists in Feature Management > Feature Flags, with at least one rule switched on in the environment you'll test. See Create a feature flag and use it in your code.
- The flag's metrics are based on events defined in Data Platform > Events.
trackEvent()only records events that already exist there. - Node.js 12.0 or later, or Python 3.6 or later.
- Your application can pass a stable, unique ID for each user.
#Steps
#1. Pick the SDK for your stack
Server-side SDKs: Node.js, Java, Python, Ruby, .NET, Go and PHP. Client-side SDKs cover Android, iOS, React Native, Flutter, React and JavaScript (web). This guide shows Node.js and Python; see the list of SDKs for the others.
#2. Get your SDK key and Account ID
Go to Configurations > Websites and Apps. On the Introduction page, find the Feature Management card ("Manage environments and view SDK keys in your pre-configured project") and click View Project. Each environment (for example, Production, Staging, Development) has its own SDK key, so copy the key for the environment you're working in. Your Account ID is shown next to the page title in Settings.
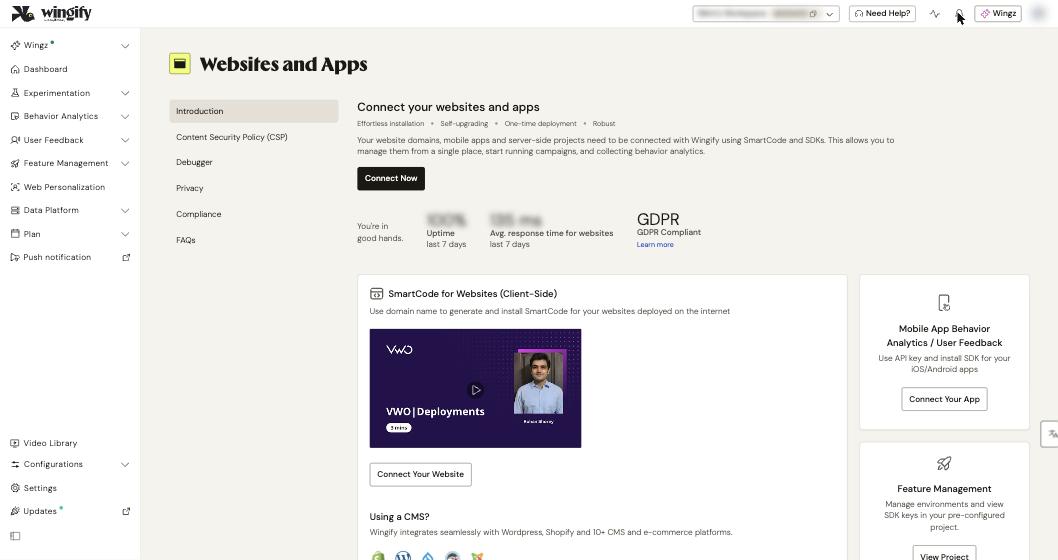
Tip: Ready-made snippets for your flag are also on the flag's API Settings tab in Feature Management > Feature Flags.
#3. Install the SDK
Node.js (npm or yarn):
npm install wingify-fme-node-sdk --save
yarn add wingify-fme-node-sdk
Python (pip):
pip install wingify-fme-python-sdk
#4. Initialize the client once, at startup
Call init() near your application's existing setup code and reuse the returned client.
Node.js:
const { init } = require('wingify-fme-node-sdk');

const wingifyClient = await init({
  accountId: '123456', // Wingify Account ID
  sdkKey: '32-alpha-numeric-sdk-key', // SDK Key
});
Python:
from wingify import init

options = {
   'sdk_key': '32-alpha-numeric-sdk-key', # SDK Key
   'account_id': '123456' # Wingify Account ID
}

wingify_client = init(options)
Note: Settings are fetched at initialization. To pick up rule changes made later in Wingify without restarting, pass the optional pollInterval (Node.js) or poll_interval (Python) in milliseconds, for example 60000.
#5. Build the user context
The user context identifies the user. id is the only required key; add custom variables, user agent or IP address when your rules target on them.
Node.js:
const userContext = {
  id: 'unique_user_id',
  customVariables: { age: 25, location: 'US' },
};
Python:
user_context = {
    'id' : 'unique_user_id',
    'custom_variables' : { 'age' : 25, 'location' : 'US' }
}
Note: Targeting on user agent or IP address (pre-segmentation) also requires the Gateway Service to be configured at initialization. See User Context.
#6. Evaluate the flag
Call getFlag() with the flag key and the user context, then branch on whether it's enabled and read variables with a default value.
Node.js:
const flag = await wingifyClient.getFlag('feature_key', userContext);
const isFlagEnabled = flag.isEnabled();
variableValue = flag.getVariable('variableKey', 'defaultValue')
Python:
flag = wingify_client.get_flag('feature_key', user_context)
is_enabled = flag.is_enabled()
variable_value = flag.get_variable('variable_key', 'default_value')
isEnabled() returns true when the user qualifies for any rollout, testing or personalize rule on the flag. The flag key is shown when you create the flag and under the flag's settings afterwards.
#7. Track a conversion
When the user completes the action your metric measures, send the event with the same user context.
Node.js:
wingifyClient.trackEvent('event-name', userContext);
Python:
wingify_client.track_event('event_name', user_context)
You can pass event properties as a third argument, for example { userType: "free" }. Property names must match the ones defined on the event in Data Platform > Events.
#Check that it worked
- Call
getFlag()with a test user who meets your rule and confirmisEnabled()returns true; switch the rule off in Wingify and confirm it returns false once settings refresh. - Set the logger level to
DEBUGininit()to see SDK decisions in your server console. - In Configurations > Websites and Apps, open your Feature Management project and use Logs for advanced debugging.
#Common questions
getFlag() always returns false. Why? The flag must already exist in Wingify and have a rule that the user qualifies for in the environment whose SDK key you used. Check the key, the environment and the rule status.
Can I segment reports on user context attributes? No. User context attributes are used for targeting. For post-segmentation in reports, send attributes with setAttribute() instead.
Is it safe to expose the SDK key? The SDK key is read-only: it can fetch flag configurations but can't change them. For browser or mobile use, create a dedicated environment that contains only client-safe flags.
I'm migrating from FullStack. What changed? FullStack used getSettingsFile() + launch(), activate() and campaign-based track(). Feature Management uses init(), getFlag() and trackEvent(). See Work with FullStack projects.
#Learn more
- List of Feature Management SDKs
- Node.js SDK: Initialization
- Python SDK: Initialization
- SDK Keys in Client-Side Environments
- Getting Started with Wingify Feature Management
Help-center sources (14)
- list of fme sdks
- fme node install
- fme node initialization
- fme node context
- fme node flags
- fme node metrics
- fme python install
- fme python initialization
- fme python context
- fme python flags
- fme python metrics
- fme sdk keys in client side environments
- Getting Started with Wingify Feature Management
- Set Up Feature Flags in Feature Management