
Secure your account (2FA, SSO, IP restrictions, alerts)
Turn on two-factor authentication, set up SAML single sign-on, restrict logins by IP or location, and get email alerts for sensitive account activity.
The Wingify Guide can move a cursor on your screen inside the app and walk you through this, click by click (3 steps).
#When to use this
Your security team asks you to harden access to Wingify before a compliance review. For example, they want every user to use a second factor, logins limited to the office network, and admins told whenever someone changes account settings. All of these controls are on the Security page. Personal options such as your own 2FA and passkeys are on Profile details.
#Before you start
- To change account-wide security settings, you must be an Owner or Admin of the main workspace.
- SSO requires the Enterprise plan and a SAML 2.0 identity provider (IdP), such as Google Workspace, Okta, Azure AD or PingOne.
- An account can use either SSO or 2FA, not both.
#Steps
#1. Open the Security page
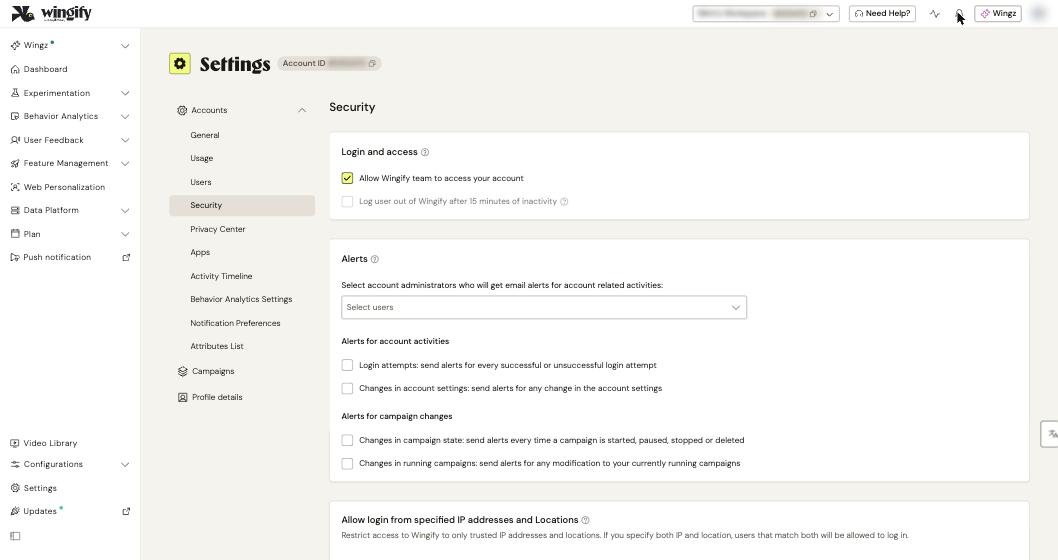
In the left sidebar, click Settings > Security.
#2. Set login and access rules
Under Login and access, choose what applies to your organization:
- Allow Wingify team to access your account: lets Wingify Support look into your account temporarily. Clear it to refuse access.
- Log user out of Wingify after 15 minutes of inactivity.
- Depending on your account, password rules may also be available: expire passwords after 90 days, and prevent reuse of recent passwords.
#3. Turn on two-factor authentication
First enable 2FA for yourself. Go to Settings > Profile details, and under Security click Enable 2FA. Choose Authenticator app (scan the QR code) or Email code verification, enter the 6-digit code and click Verify and Enable 2FA. Download your backup codes: you need them if you lose your phone or email access.
Then enforce 2FA for everyone. Back on the Security page, go to Two-factor authentication enforcement, select Enable two-factor authentication and click Confirm. All users of the main workspace must use 2FA from their next login and are notified by email.
Note: 2FA settings are independent per workspace. Enforcing 2FA on the main workspace doesn't enforce it on additional workspaces. Enable it in each workspace's settings.
#4. Or set up single sign-on (SSO)
In the Single Sign-On section, click Configure & activate SSO.
- In your IdP, create a custom SAML application. Use
https://app.wingify.com/login/ssocallbackas the ACS / sign-on URL andhttps://app.wingify.comas the entity ID, with email as the Name ID. - In Wingify, upload the IdP's SAML certificate (.pem, .csr, .cer or .cert) and paste the SSO entry point URL from your IdP.
- Click Test the SSO configuration. This step is mandatory. Activate SSO stays disabled until the test succeeds.
- Under Workspace Access, choose Enable all workspaces or Select workspaces.
- Click Activate SSO.
From their next login, all users must sign in with Sign in using SSO. Their current sessions aren't ended.
Tip: Keep one Admin user with SSO disabled and a strong password stored safely. You can then still manage SSO if your IdP goes down.
#5. Restrict logins by IP address or location
Scroll to Allow login from specified IP addresses and Locations. Enter allowed IPv4 addresses, one per line (regular expressions are supported), and click Save, or click +Add Location to allow a country, region or city. If you set both IPs and locations, users must match both.
Warning: Before saving, check that your own IP or location is on the list, or you may lock yourself out.
#6. Configure email alerts
Under Alerts, choose admins in Select account administrators who will get email alerts for account related activities. Then select the events:
- Login attempts: every successful or unsuccessful login.
- Changes in account settings.
- Changes in campaign state: a campaign is started, paused, stopped or deleted.
- Changes in running campaigns.
Click Save. Only users with Admin privileges can receive these alerts.
#Check that it worked
Log out and log back in. With 2FA, you're asked for a code after your password. With SSO, you're redirected to your IdP. Trigger a setting change to confirm that the chosen admins receive an alert email.
#Common questions
I lost my authenticator app. How do I log in? On the 2-Step Verification screen, select Enter a backup code and enter one of your unused codes. Generate a new set in Profile details > Security > Backup codes. An Owner or Admin can also disable user-level 2FA for you on the Users page.
Can only some users use SSO? No. Once SSO is on, all users must use it. However, when adding a new user, an Admin can turn off SSO for that specific user.
What happens if our identity provider goes down? Contact Wingify Support to disable SSO. Users can then set a password with Forgot Password.
Can I log in without a password at all? Yes, with a passkey (fingerprint, face or device PIN). Add one in Profile details > Passkey, then choose Sign in with Passkey on the login page.
#Learn more
- Configure Security Settings in Your Wingify Account
- Manage Two-Factor Authentication (2FA) in Wingify
- Enabling Single Sign-on in Wingify
- Configuring Single Sign-on for Wingify
- Manage User Login by IP Address and Location
Help-center sources (7)
- Configure Security Settings in Your Wingify Account
- Manage Two Factor Authentication 2FA in Wingify
- Enabling Single Sign on in Wingify
- Configuring Single Sign on for Wingify
- Manage User Login by IP Address and Location
- Configure Alerts in your Wingify Account
- Use Passkeys to Log In to Your Wingify Account